Okay, now for the last part of this tutorial: We’re going to turn the motion trails effect into a Digital Asset, which a single node with inputs, outputs and parameters (just like any other node) that can be shared with other artists. The network we made to create the effect is big and ugly, and no one in their right mind would want to copy and paste that whole thing from scene to scene and start jumping across the SOP and CHOP networks and look for individual nodes to tweak parameters. Digital Assets let us package everything together nicely.
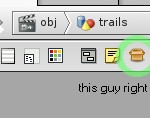
The first thing to do is to select all the nodes currently in your geometry network (inside the “trails” object), and click the little icon shaped like a box to create a “Subnet” object (see Fig. 1). This groups your whole network together into a nice little package, complete with inputs and an output.
Double-click the Subnet to see your original network. The first thing you will probably notice is that there are four little boxes in your network called “Sub-Network Input #1-4.” These are placeholders for the four inputs you saw on the Subnet node itself. Whatever you plug into the input #1 of your Subnet will then output from the box labelled “Sub-Network Input #1.” We’ll only be using the first input here, since the only shape information we need is the object we’re emitting trails from. Connect the output of Sub-Network Input #1 to the first input of your network, which should be the Time Blend SOP.
Now we need to start going through our network and looking for attributes that we’ll want to be controlling. This part will take a while, since it’s not necessarily obvious which channels you’ll want to have control over from the very start, but fortunately it’s a pretty easy process once you’ve done it a few times.
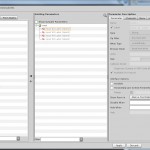
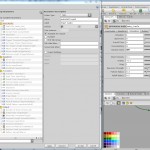
Going down the network, the first parameter we’ll want control over is the Seed parameter of the Sort SOP. This controls the random seed that determines which points are selected for emission. In order to control this parameter, first we have to go back up to the Subnet node, and start adding parameters. Select the Subnet node, go to your Parameters window and click the little icon shaped like a gear, then choose “Edit Parameter Interface.” You can also just right-click the Subnet node and choose “Edit Parameter Interface” from there. What you’ll get is a big scary window that looks like Fig. 2.
On the left side is a list of parameter types: Buttons, floating point numbers, strings, integers, vectors, etc. In the middle is the existing parameter structure of your selected node, which right now is just four String parameters grouped together under the “root” of the parameter interface. On the right side are the settings for the selected parameter. You won’t be able to edit the built-in Subnet parameters quite yet, but you can add as many of your own as you like.
Since the Seed attribute is an integer, start by dragging an Integer parameter from the left pane into the center pane. If you were to click “Apply” at the bottom right now, you’d see a new parameter pop up in your Parameters view, with a label “Label” and a value of zero, with a slider next to it. We can change those values using the right-hand Parameter Description pane. The “Name” is the parameter name as Houdini sees it. Let’s call it “pointsSeed.” The Label is what the user sees, so type something a little prettier like “Random Seed.” The last thing to do here is set a range, since by default the slider will only go from zero to ten, which is not very many values for a random seed. Check “Range” and then set the maximum value to something huge, like 10,000. Hit “Accept” and your Parameter view should update to reflect the new changes.
Now we have to connect this parameter to the Seed value of our Sort SOP inside the Subnet. We could type in the channel name manually, but it’s much easier to just right-click the new Random Seed channel we made in the Parameter view, and select “Copy Parameter.” Next, jump inside the Subnet and select the Sort SOP. Right-click the Seed parameter and select “Paste Copied Relative References.” The expression for this value will appear as something like ch("../../pointsSeed"), which is looking for a channel called “pointsSeed” on the parent of the Sort SOP (which is the Subnet node) and returning its value. Now we can control this from the Subnet! On to the next parameter.
There are a lot of parameters on the POP Network that we’ll want control over: the Start Time, Preroll Time, Random Seed (again), and Oversampling parameters all have potential to be tweaked by the user. Jump back to the Subnet, open the Edit Parameter Interface window, and create four new controls: Start Time (float, variable name startTime), Preroll Time (float, variable name prerollTime), Random Seed (integer, variable name seed), and Oversampling (integer, variable name oversampling). If you want to set default values for any of these parameters (to match the ones that work for your current simulation, for example), you can go to the Channels tab of the Parameter Description pane and set a default. Once the parameters are all added, then you can copy each parameter and then paste the relative reference to the appropriate channels on the POP Network node.
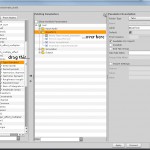
Another way to create parameters on your Subnet is to create them based on another node that already exists. This is really handy for more complicated control structures such as dropdown menus. As an example, let’s say we want a control that can choose the type of noise that affects our waveform (sparse, hermite, etc). The original channel is in the “noise1” CHOP in our CHOPnet. Under the Create Parameters pane of the Edit Parameter Interface window, go to the “From Nodes” tab and find the noise1 node inside your CHOPnet. Open up the tree view, and inside you will find several folders of parameters. In the “Noise” folder, there is a channel called “Type” (variable name “function”), which is the channel we want. Simply drag this into your Existing Parameters pane, and a copy of that control will be added to your interface (Fig. 3).
It would be really tedious for me to write out instructions for every single parameter, so you can figure out which parameters to add to the interface on your own. Don’t forget that you’ll need some channels from inside your POP network (to control forces and the like), and you’ll need to control some other channels in your CHOP network as well as from some of the other nodes in your geometry context.
Now let’s do some fancy shit.
Let’s say you don’t always want to output extruded polygons from your network… you might sometimes want just NURBS curves, or maybe you want just the original points that made up the trails. It’s not hard to just wire a Geometry ROP to different points in the network to save out the geometry you want, but if this network is going to exist as a neat little package, it’s best to just have that single output.
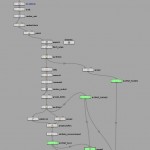
To do this, we can use a SwitchSOP. The switch allows you to wire as many inputs as you want into it, and it will output the result of one of those inputs based on the “Select Input” parameter. Now all you have to do is wire connections from the appropriate parts of your network to the Switch SOP. I like using Null SOPs to visually represent each possible output of the network: for example, for the “points only” output, I would create a Null SOP and wire the output of the POP network to it, then name it “OUTPUT_POINTS.” Then drag OUTPUT_POINTS off to the side somewhere, and wire it to the Switch SOP. See Fig. 4 for an example; my network has a few extra nodes in it that I haven’t mentioned in this tutorial but the green highlighted nodes are the outputs, each connected to the “switch_outputType” Switch SOP.
Now to build a control for this switch. Go back out to the Subnet and edit the parameter interface. Create an Ordered Menu control, and name it “outputType.” In the Parameter Description pane, you can then create a number of options, each with a “Token” value, which is basically an array index, and a label. The order in which these appear depends on the order of inputs into your Switch SOP. If the first input of your switch is “OUTPUT_POINTS,” then you should assign the first menu item with a token of zero and a label like “Points.” Then apply the new parameter, right-click it in the Parameters window, copy the parameter, dive into your Subnet, and paste the relative reference to the “Select Input” parameter of your Switch SOP. Now when you change the Output Type control, your new node should change its output entirely.
We can use this same switch setup for other things in the network, too. Let’s say the user might want to emit from very specific points on the model, instead of at random. Instead of defining a group of random points using the Sort SOP, we’ll need to have an alternate path that accepts a list of points. To do this, we’re going to create a Group SOP right next to the “randomPoints” Group SOP we set up earlier. Connect the output of the Trail SOP to the first input of your new group. The group name will need to be the same as the randomPoints group, since the POP Network is looking for that point group by name, so even though this group is for ordered points, it still might be named “randomPoints.” A little confusing, but whatever. Make sure your new group is a point group. Now create a Switch SOP, and connect both of your point group SOPs to it. Make sure the randomPoints group is the first input. Then connect the output of this switch to the first input of the Point SOP below. See Fig. 6 for an example of the network.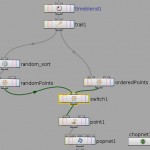
Next, we have to create an interface for this. We’ll need some kind of option menu to choose which of these groups we want to use, and then we’ll need some kind of control to define which points we want to emit from if we’re using specific points. Create another “Ordered Menu” type control, and set the first index as “Random,” and the second as “From Group.” Then create a new string control and name it “groupPattern.” Set the label as “Pattern.” Now we have to connect these parameters to your network. Close the Edit Interface window, and copy the “Emission Method” control, then paste the relative reference to the “Select Input” of your new switch. Do the same for the “groupPattern” control, and paste the reference to the “Pattern” slot of your new Group SOP. Now if you select “From Group” as your emission method and then type a list of points into the “Pattern” control, your network should emit trails from the points you specified. Keep in mind you’ll need to adjust the “Number of Trails” control accordingly, or you’ll get some weird results.
Your custom node is just about done. By this time you probably have a ton of controls, which may or may not look pretty hideous and disorganized. There are a number of ways you can clean up the interface, the simplest of which is to create folders to house your controls. In the Edit Parameter Interface window, you can drag Folders into the Existing Parameters window, and then organize your controls under labelled folders. Separator controls are also good for dividing controls into groups that don’t warrant their own folders. You can see an example of this structure in Fig. 5.
One last trick. If you select a control in the Edit Interface window, at the bottom of the Parameter Description window you’ll see a section for “Interface Options.” There are a couple of text fields here for “Disable When” and “Hide When,” which allow you to set rules for when the control is visible. The syntax is a bit weird, and not particularly well-documented, but it’s simple enough once you have an example or two.
One of your controls is probably the thickness of the polygon tubes that are generated. You don’t need to have access to this control unless your network is set to actually output these tubes; if you created the Switch setup then there is a chance you will only be outputting curves or points. The parameter we created earlier that drives the output type is called “outputType,” and in my network it ranges from 0 to 3. Values 0 and 1 are for points and curves, respectively, while 2 and 3 are for polygons and polygons & curves. The thickness parameter, then, only needs to be accessible if outputType is greater than 2. For the “Disable When” string, then, type this expression in:
{ outputType < 2}
The expression needs to be contained in curly braces, and the “outputType” variable isn’t called like a local variable would be, but otherwise the syntax is simple enough. Now the control will be disabled if it’s not needed. You could apply this same idea to other parameters in your interface, such as the number of polygon divisions, or to the “Pattern” control to make it disappear when you’re emitting from random points.
The last thing to do is to save your fancy new subnet as a Digital Asset. With the Subnet selected, right-click and choose “Create Digital Asset.” You can choose an operator name and label, and then choose 1 minimum input and 1 maximum output. Once that’s done, you can drop copies of your network down like anything else! If you want to edit an asset that’s already been created, you can right-click a copy of the node and select “Allow Editing of Contents.” To save changes you’ve made back to the node’s definition, right-click and choose “Save Operator Type,” then choose “Match Current Definition” to make the node read-only again.
That’s it for this tutorial. If you want to check out my build of the network for Houdini 12, it’s right here. As always, comment away if you have any questions or if there are any inaccuracies.
