If you’re using mental ray as your renderer, chances are that you aren’t going to get a whole lot out of the passes system, especially if you’re trying to write custom color buffers. It’s a slow, buggy, work-intensive process to get a lot of passes out of mental ray that Vray has absolutely no trouble with. You could use render layers instead of custom passes, but mental ray also has a particularly long translation time for complex scenes (think of any scene where you see mental ray hang for about 10 minutes before it even starts to render a frame). So you can’t exactly add render layers haphazardly… you need to condense things as much as possible.
Someone told me about a neat trick that they saw at a studio they were freelancing at where three data channels would be written to RGB channels, almost like an RGB matte pass except with “technical” passes instead of mattes or beauty or whatever. Since the data being written only needs a single channel, you can get three kinds of data written to one image and then split them apart later in post. Simple enough when you think about it…
The three passes I typically write to this “tech” pass are Z depth, ambient occlusion, and incidence angle (facing ratio in Maya terms). Depth and occlusion are used in almost every scene, and incidence comes in handy with Fresnel-type surfaces like glass or water. Here’s how to build the shader:
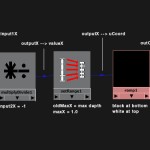
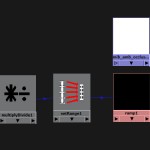
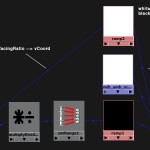
Start with a Maya surface shader. We’ll do depth first. Create a samplerInfo node. We’ll use the pointCameraZ property of this node, which calculates how far away the pixel currently being rendered is away from the camera. Since cameras by default look down their own Z axis in the negative direction, we’re going to multiply the result by -1 in order to get a positive number. To do that, we multiply samplerInfo.pointCameraZ by -1 using a multiplyDivide node. Now that we have depth as a positive float value, we need to crunch it into an acceptable range so that we can use it to drive a ramp’s position (ramp position values go from 0 to 1) and for that we’ll use a setRange node. Connect multiplyDivide.outValueX to setRange.valueX, set setRange.maxX to 1, and then set setRange.oldMaxX to the maximum depth you want for your scene. Connect the setRange.outValueX to a ramp’s vCoord, and then set the ramp’s colors to be black on the bottom (zero) and white on the top (one). Finally, connect the ramp’s outColorR to the outColorR of the surface shader. Done! That’s the most complex of the three channels.
Next up is the ambient occlusion, which we’ll plug into the green channel. Since AO is generally a black and white image, we don’t lose anything by ditching two color channels. Create an mib_amb_occlusion texture and connect the outColorG to surfaceShader.outColorG. Easy enough.
Last up is the incidence angle pass. We can use the earlier samplerInfo node for this… connect samplerInfo.facingRatio to a ramp texture. Set the ramp to black at the top (position 1.0) and white at the bottom (position 0). FacingRatio returns a number between 0 and 1 depending on the angle of the surface normal relative to the camera… if a side is facing directly towards you, it returns 1, and if it’s perpendicular to your line of sight, it returns 0. Perfect for driving the vCoord of a ramp. Finally, connect the outColorB of the ramp to surfaceShader.outColorB.
Now you can assign this surface shader as an override to a render layer and get 3 passes for one layer instead of dealing with the render pass system. Or you could convince your studio to get Vray.
I built a MEL script a while back that automates this process and adds a few extra features to make tuning the shader a little easier. If you select a camera and run the script, it will attach two wireframe NURBS spheres to your camera which will show you the near and far clipping planes of your depth pass. You can adjust the near and far values with channels added to the camera’s transform. This way you can get an exact fit for your depth pass so you’re not losing any depth information. The script also adds controls for the AO texture directly to the camera’s transform, so you can fully tune the shader right from the camera.
I wrote this a while ago and I’m sure improvements could be made, but either way here’s the script. To run it, put the file into your MEL scripts folder, then select a camera transform (not the shape) and run:
hfTechShader();
And finally, the script lives here (right click > Save As). Hope it’s helpful.


1 Comment
glenn suhy · 07/14/2011 at 16:34
Only becomes tricky when you have many render layers and various shaders with displacement maps.
Overall tech shader is still the shit!
Glenn Suhy
Comments are closed.